Showing posts with label PHP. Show all posts

Sunday, November 7, 2021

All that you need to know about hiring a PHP developer


PHP has served to be one of the most trusted servers for developing websites with various customizations. Several people use the server-side scripting language to develop different kinds of websites.


Factors to consider before hiring a PHP developer:


There are several factors you must consider before hiring PHP developers. Some of the most crucial ones are as follows-


  1. Understanding your needs- It is crucial to specify your needs while you hire a PHP developer. Remember, you can make the most of your alliance with a developer when your tastes match their skills. It would be best if you hired a PHP developer based on this.


  1. Years of experience- Hiring an experienced and dedicated PHP developer is crucial for building any website. Through their years of experience, PHP developers can enhance their efficiency and tackle several difficulties. You must also hire dedicated PHP developers as they pour all their efforts into ensuring you have the best website design and layout.


  1. Choose the suitable development model- Choosing the best development model is as crucial as choosing the right PHP developer. They would generally help you understand the pros and cons of each development model and suggest which suits you the best. Remember, different websites require different development models based on the number and kind of web pages you need. The development model also determines the cost of building a website and the time consumed in the development process.


  1. Support and backup- It is essential to ensure your PHP developer or team has an efficient backup or risk management plan. These plans help you to overcome several difficulties in the development and execution process without delay. It would be best to look for a PHP developer who could provide 24*7 support services to handle your queries.


Costs of hiring a PHP developer


The cost of hiring a PHP developer depends on several factors like his experience, skills, your country, and much more. The amount a PHP developer earns depends on the country in which he is situated and the rate of technological development. Thus, hiring a PHP developer in Norway would be different from Denmark or other countries. You can also hire PHP developers either for your entire project or on an hourly basis. While hiring PHP developers hourly would cost you less, hiring them for the whole of the project is a wiser decision. When you hire PHP developers on a project basis, they make sure they look into every factor and step in your website development process and are available whenever you need. On the other hand, PHP developers are only available for the hours you hire them in hourly contracts. 


Conclusion

You must consider several factors while hiring PHP developers. The cost incurred on hiring them depends on the factors mentioned above. However, it is crucial to have an approximate budget before you start with the website development process.


Read Also:


Monday, May 25, 2020

Your Guide to Best PHP Frameworks for 2020

Best PHP Frameworks


PHP is the most mainstream scripting language for backend web advancement. One reason why PHP has held its situation as the top server-side administration language is its propelled systems. PHP structures are web-arranged, implying that they assist engineers with building web applications all the more gainfully. 

PHP utilizes various structures which have their advantages and disadvantages, for the site improvement. A system is an instrument with all the capacities and techniques predefined in it, making the site improvement essential and more straightforward. You don't have to compose lines of code that are utilized on different occasions during web improvement. Systems give you office to compose quicker and utilize strategies or capacities in a lot less complicated way. 

Out of all the programming dialects, PHP has been one of the most well-known dialects for a couple of years at this point. Be that as it may, with the rising complexities of the sites, designers need to compose various lines of codes, which makes the assignment dreary and tedious. Likewise, beginning without any preparation each time is additionally not plausible. This problematic issue has been tended to with the utilization of PHP structures. 

The PHP frameworks accelerate the site improvement process by offering efficient and reusable codes that can be utilized for comparable ventures.

Here are the best PHP frameworks for development in 2020

Codeigniter is a lightweight PHP system with various prebuilt modules. These modules help in building robust and reusable codes. Codeigniter is just 2 MB in size, including the documentation. It is a straightforward system that can be introduced effectively and requires insignificant client setup. 

Codeigniter has an MVC engineering. It is equipped for taking care of mistakes successfully and has inbuilt apparatuses. It's sophistication and simplicity has given rise to better and large scale Codeigniter development services.

Laravel is a Model-View-Controller system that utilizes PHP, one of the most mainstream dialects of the web. It's generally youthful contrasted with different systems on this list. Laravel accompanies API support out of the crate; it has an excellent measure of bundles that could expand its scope. Laracasts is a screencast instructional exercise site with over a thousand recordings on PHP, Laravel, and frontend technologies in the Laravel biological system that could be viewed as a beginner's paradise. 

The PHP Symfony framework also provides pre-written code for PHP developers. You will find that it is highly-useful for large-scale projects, but the framework mostly targets people that have more programming experience. PHP Symfony framework offers a seamless way of localizing websites and translating interfaces. Therefore, your web application is adaptable as you will be able to provide, let's say, English and French versions of your website.

CakePHP has been in the market for longer than 10 years and has emphatically advanced itself with time. What's more, along these lines, it is still very well known among the designers. The most recent variant of CakePHP is progressively composed and has improved measured quality with extra independent libraries. 

The CRUD (Create, Read, Update, and Delete) highlight of CakePHP permits the engineers to get a starter perspective on the application, which makes the errand simpler as they can alter and refresh their work whenever and have command over the final product. 

Endnotes

PHP is behind a majority of websites that are online today. The demand for PHP has been growing consistently and will continue to do so in the upcoming years.

Read Also:

Friday, January 9, 2015

How to Fetch the Alexa Rank of the Website with PHP Script

Alexa rank is a most important factor of any particular website. It is a frequency of visits on a website. Lower Alexa rank means higher traffic to that website. Its ranking system is based on information collected from users who have installed its toolbar.

Fetch the Alexa Rank of the Website

Here, You will find, how to fetch the Alexa rank of a particular website with suing a simple PHP script. To get the Alexa rank, we have to pass the URL of a website to getAlexaRank() function.
The function will return the rank which can further be stored inside a variable or in the database, or can be displayed on screen.

//PHP Script to Fetch Alexa Rank

function getAlexaRank($url){
$xml = simplexml_load_file('http://data.alexa.com/data?cli=10&dat=snbamz&url='.$url);
$rank=isset($xml->SD[1]->POPULARITY)?$xml->SD[1]->POPULARITY->attributes()->TEXT:0;
return $rank;
}
echo getAlexaRank('http://coffeecupweb.com');

Thursday, January 8, 2015

How to Fetch Facebook Share, Likes, Comments count from an Article using PHP

As we know that, now-a-days social media like, share and comment play a vital role to promote any article, post or web pages. It becomes a trend to show Facebook like, share and comment without using third party social plug in for the website pages. There are multiple ways to achieve this using PHP like Facebook query language and Facebook graph. Here, check out simple PHP code to fetch Facebook likes, share and comment count using PHP.


Method 1: Facebook Query Language  :-

<?php
 $source_url = 'https://www.facebook.com/webprogramminghub';
 $query_for_fql  = "SELECT share_count, like_count, comment_count FROM link_stat WHERE url = '".$source_url."'";
 $fqlURL = "https://api.facebook.com/method/fql.query?format=json&query=" . urlencode($query_for_fbl);
 $response = file_get_contents($fqlURL);
 $json_data = json_decode($response);
 $fb_share_count = $json_data[0]->share_count;
 $fb_like_count = $json_data[0]->like_count;
 $fb_comment_count = $json_data[0]->comment_count;

        echo 'Facebook Share:'.$fb_share_count.'<br/>';
        echo 'Facebook Like:'.$fb_like_count .'<br/>';
        echo 'Facebook Comment:'.$fb_comment_count .'<br/>';
?>

Method 2: Facebook Graph API :-

<?php
 $source_url = 'https://www.facebook.com/webprogramminghub';
 $json_string = file_get_contents('http://graph.facebook.com/?ids=' . $source_url);
 $json = json_decode($json_string, true);
 fb_share_count = $json[$url]['shares'];

 $json_string = file_get_contents('http://graph.facebook.com/webprogramminghub’);
 $json = json_decode($json_string, true);
 $fb_like_count  = $json[$url]['likes'];

 echo 'Facebook Share:'.$fb_share_count.'<br/>';
 echo 'Facebook Like:'.$fb_like_count .'<br/>';

?>

Monday, January 5, 2015

Learn How to Parse RDF and RSS feed Using PHP

RSS stands for Really Simple Syndication, which allows us to syndicate our website content. RDF stands for Resource Description Framework to describe resources on the web. As we know, there are so many online tools for RSS reader. But here, I explain how to parse RDF and RSS feed with the help of Simple PHP function. Here, we will use SimpleXML library of PHP, which converts XML data to an object.

Parse RDF and RSS feed Using PHP

Function for RSS & RDF XML Parser :-

function rss_rdf_parser($feed_url){
 $path_parts = pathinfo($feed_url);
 switch($path_parts['extension']){
 case 'rdf':
 $getContents = file_get_contents($feed_url);
 $rdf_replace = str_replace("rdf:", "", $getContents);  // delete all rdf: values to manipulate input with SimpleXml object
 $arrXml = new SimpleXmlElement($rdf_replace);

 $returnHtml = '<ul>';
 foreach($arrXml->item as $entry){
 $returnHtml .= "<li><a href='".$entry->link."' title='".$entry->title."' target='_blank'>" . $entry->title . "</a></li>";
 }
 $returnHtml .= '</ul>';
 break;

 case 'xml':
 $getContents = file_get_contents($feed_url);
 $arrXml = new SimpleXmlElement($getContents);
 $returnHtml = '<ul>';
 foreach($arrXml->channel->item as $entry){
 $returnHtml .= "<li><a href='".$entry->link."' title='".$entry->title."' target='_blank'>" . $entry->title . "</a></li>";
 }
 $returnHtml .= '</ul>';
 break;
 }
 return $returnHtml;
 }

index.php :-

echo 'RSS Result:'
 $rssResult = rss_rdf_parser("http://rss.dailynews.yahoo.co.jp/fc/economy/rss.xml");
 echo $rssResult;

 echo 'RDF Result:'
 $rdfResult = rss_rdf_parser("http://www.mhlw.go.jp/stf/news.rdf");
 echo $rdfResult;

Source : stepblogging

Get Acknowledgement of Top 15 MySQL GUI Tools

MySQL GUI tools help to manage MySQL database. These tools integrate SQL development, database design, administration, Creation as well as maintenance into a single and the useful development environment for MySQL database systems.

Among various MySQL GUI tools, here I have compiled some best MySQL GUI tools to combine the process of web development as per your needs.

1. MyDB Studio :-  


2. dbForge Studio :- 


3. SQLYog :-  


4. HeidiSQL :-


5. DBTools Manager :-  


6. phpMyAdmin :-  


7. SQLWave :-  


DOWNLOAD   
8. Sequel Pro :-  


9. SQL Maestro MySQL Tools Family :-  


DOWNLOAD   

10. Navicat :-  


11.  MySQL Workbench :-


12. Database Master :- 


13. Neor Profile SQL :-  


14. SQLMastero :-  


15. Toad :-  


Source : stepblogging

Friday, January 2, 2015

Nine Distinctive Websites to Learn PHP at Your Own

PHP is a broadly used open source programming language which is suited for web development and can be embedded into HTML. If you want to learn PHP, check out the online manual with lots of examples. Here, You will get top 9 websites to learn PHP Development. Hope, you found this very helpful.

Top Websites to Learn PHP

devzone.zend.com

Zend

tizag.com


tizag

phpbuddy.com


phpbuddy

php.net
php

developphp.com


developphp

zend.com


zend

stackoverflow.com


stackoverflow

lynda.com


lynda

homeandlearn.co.uk


homeandlearn


Thursday, January 1, 2015

How to Export MySQL Data into JSON Format in PHP

JSON :-
JSON

JSON is a lightweight data interchange format, It is very easy to read as well as write. Additionally, It is very for machines to parse and generate. We can easily manage and exchange data across various platforms.

Majority of social networking websites including Facebook, Twitter use JSON as a data exchange format.

JSON Array starts with "[" and ends with "]". Number of values can reside between them. If there are more than one value then they are separated by ",".

For example :-

[
   {"id":"1","name":"Ethan","roll_no":"131","degree":"BSCS"},
   {"id":"2","name":"Janet","roll_no":"135","degree":"BSCS"}
]

JSON Object :-

An object starts with "{" and ends with "}". Between them, a number of string name/value pairs can reside. The name and value is separated by a ":" and if there is more than one name/value pairs then they are separated by ",".

For example :-

{"id":"1","name":"Ethan","roll_no":"131","degree":"BSCS"}

PDO :-

The PHP Data Objects (PDO) extension defines a lightweight, consistent interface for accessing databases in PHP. PDO provides a data-access abstraction layer, which means that, regardless of which database you're using, you use the same functions to issue queries and fetch data. You just need to change the database drivers. Let's start.

Student table :-
Student table

With SQL query :-

CREATE TABLE IF NOT EXISTS `student` (
  `id` int(10) NOT NULL AUTO_INCREMENT,
  `name` varchar(255) NOT NULL,
  `roll_no` varchar(255) NOT NULL,
  `degree` text NOT NULL,
  PRIMARY KEY (`id`)
)

Records in MySQL :-
Records in MySQL
With Query :-

INSERT INTO `student` (`id`, `name`, `roll_no`, `degree`) VALUES
(1, 'Ethan', '131', 'BSCS'),
(2, 'Janet', '135', 'BSCS'),
(3, 'Anna', '117', 'BSCS'),
(4, 'Pauline', '112', 'BSCS'),
(5, 'Ryan', '1244', 'BS Telecommunication'),
(6, 'Jane', '084', 'BSCS');

index.php :-

<?php
//PDO is a extension which  defines a lightweight, consistent interface for accessing databases in PHP.
$db=new PDO('mysql:dbname=jason;host=localhost;','root','');
//here prepare the query for analyzing, prepared statements use less resources and thus run faster
$row=$db->prepare('select * from student');

$row->execute();//execute the query
$json_data=array();//create the array
foreach($row as $rec)//foreach loop
{
$json_array['id']=$rec['id'];
    $json_array['name']=$rec['name'];
    $json_array['roll_no']=$rec['roll_no'];
    $json_array['degree']=$rec['degree'];
//here pushing the values in to an array
    array_push($json_data,$json_array);

}

//built in PHP function to encode the data in to JSON format
echo json_encode($json_data);

?>

Output in JSON format :-
Output in JSON format

Tuesday, December 23, 2014

Test Your Code Quality Through PhpMetrics

There are many tools available in the market to check and analyze the website's code. However, today, I will share one new with all of you. YES, IT IS PhpMetrics. PhpMetrics uses D3 as well as other cool analysis algorithms to check and scan our application's code and provide output according to that. As a PHP Developer, It is very necessary to check and test our code quality for extensive PHP Web Application Development.

PhpMetrics

Installation of PhpMetrics :-

Let's understand every part with an example. It would be easy to get into it. 

Required Environment :-

Isolated environment is a necessary to test it. So, make sure all users have the same environment to test it easily. 

How to install PhpMetrics?? :-

Installation is a very easy. There is a need to install it globally. So, It will be available for all projects on the same machine.  

1. sudo composer global require 'halleck45/phpmetrics' 

Fetching of the Code  :-

We will test PhpMetrics on two code-heavy projects :- First is Laravel, and Second is Symfony.

1  git clone https://github.com/symfony/symfony symframe
2  git clone https://github.com/laravel/framework lframe

PhpMetrics on a Code-Heavy Project :-

Now, let's run PhpMetrics on a downloaded project. 

1 mkdir Laravel
2 mkdir Laravel/public
3 phpmetrics --report-html=/Laravel/public/report_symfony.html symframe
4 phpmetrics --report-html=/Laravel/public/report_laravel.html lframe

Here, I use "Laravel” folders to reduce the configuration steps. This lets us easily access the reports at the following URLs: 

1. homestead.app:8000/report_symfony.html
2. homestead.app:8000/report_laravel.html

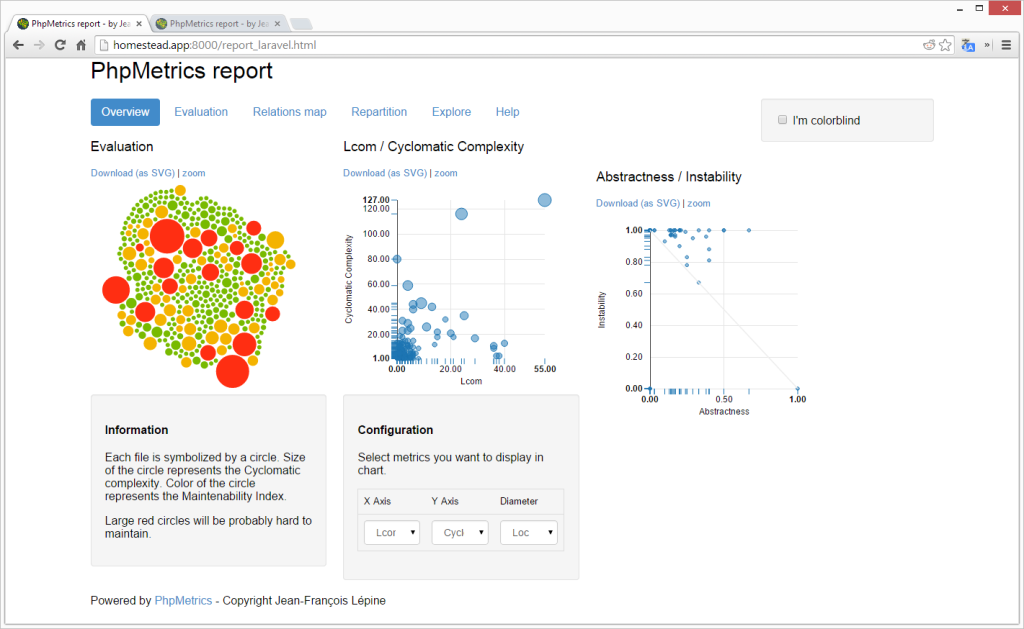
Laravel’s Report :-

Laravel

Symfony Report :-

Symfony

Analysis :- 

PhpMetrics offers a plethora of metrics. Let’s clarify those circles and graphs to check out what we are looking for.

Tables Format :-

Check out the data in a tabular form, check out the "Explore" tab in the below report.

Tables Format

In above table, all are there including lines of codes and classes per file as well as a folder. Check out this report, when you need very important information about your code all in one place.

Let's Move to the Custom Chart :-
Custom Chart

We are comparing the ratio of CC and Lcom for every single file. Here, you can check that, Laravel’s trend is proportional – with more LoC & Difficulty, while Symfony tends to be all over the place with certain files.

Custom Chart

For example, the Symfony file BinaryNode.php has a too much difficulty for 150 lines of code, while Response.php has a low difficult which has 1275 lines of code. Explore the files that create more curious results, and see what you can find out from those. 

Evaluation :-

This is a web chart which takes the average of different attributes of your whole project, Compare these numbers to the standard of other projects the tool has learned and evaluate your values over those.  
Evaluation


Evaluation

Here, Laravel is more developers friendly.

Repartition :-
Check out the repartition screen which includes all the data in a very much simple format than explore tab.

Symfony :-

Repartition - Symfony
Laravel :-
Laravel
Comparison of both the Result :-

1. Laravel is more user-friendly, light weight as well as less bloated in file size.
2. Symfony is three times more in weight, including classes, methods, files, line of code.
3. Laravel is much stable than Symfony.
4. Symfony is more complex than other.  

Reference :- http://www.sitepoint.com/visualize-codes-quality-phpmetrics/

Saturday, December 20, 2014

How to Create Article Post Time Ago Function in PHP

Get the function to create article post time ago function with using simple PHP codes. The function counts the time differences in words. Most of the popular sites use this function to show the time. For example :- It shows 15 minutes ago.

Article Post Time Ago Function in PHP


Create a simple Function  :- 

function timeAgo($ptime) {
    $setime = time() - $ptime;
   
    if ($setime < 1) {
        return '0 seconds';
    }
   
    $interval = array( 12 * 30 * 24 * 60 * 60  =>  'year',
                30 * 24 * 60 * 60       =>  'month',
                24 * 60 * 60            =>  'day',
                60 * 60                 =>  'hour',
                60                      =>  'minute',
                1                       =>  'second'
                );
   
    foreach ($interval as $secs => $str) {
        $d = $setime / $secs;
        if ($d >= 1) {
            $r = round($d);
            return $r . ' ' . $str . ($r > 1 ? 's' : '');
        }
    }
}

Use the below code snippets :-

$t=time()-600;
echo time_ago($t);  //outputs => 10 mins

$t=time()-3600;
echo time_ago($t);  //outputs => 1 hour

$t=time()-86400 * 65;
echo time_ago($t);  //outputs => 2 months

Reference :- http://freewebmentor.com/2014/11/create-article-post-time-ago-function-php.html

Friday, December 19, 2014

Check How to Login With Google Account OpenID in PHP

Here, is the tutorial about to do login with Google account OpenID in PHP. With using minimum line of PHP codes, we can collect required user information from Google, and use this information to register as well as login.


Create Sample Database Table :-

Sample database table with columns id, email, oauth_uid, oauth_provider and username.

CREATE TABLE users
(
id INT PRIMARY KEY AUTO_INCREMENT,
email VARCHAR(70),
oauth_uid int(11),
oauth_provider VARCHAR(100),
username VARCHAR(100)
);

Directory structure :-

Google-login    //Google logn OpenID library
    config
    --dbconfig.php
    --functions.php  
    google-open
    --openid.php

    images
    --googlebtn.png
 
    getGoogleData.php
    home.php
    index.php
    login-google.php
    logout.php    //Logout page

dbconfig.php :-

Connection file to connect with your database.

<?php

define('DB_SERVER', 'dbserver');
define('DB_USERNAME', 'username');
define('DB_PASSWORD', 'password');
define('DB_DATABASE', 'database');

define('USERS_TABLE_NAME', 'users_table_name');

$connection = mysql_connect(DB_SERVER, DB_USERNAME, DB_PASSWORD) or die(mysql_error());
$database = mysql_select_db(DB_DATABASE) or die(mysql_error());

?>

Function.php :-

<?php
include 'config/functions.php';

session_start();

if (!empty($_GET['openid_ext1_value_firstname']) && !empty($_GET['openid_ext1_value_lastname']) && !empty($_GET['openid_ext1_value_email'])) {  
    $username = $_GET['openid_ext1_value_firstname'] . $_GET['openid_ext1_value_lastname'];
    $email = $_GET['openid_ext1_value_email'];

    $user = new User();
    $userdata = $user->checkUserGoogle($uid, 'Google', $username, $email);
    if(!empty($userdata)) {
        session_start();
        $_SESSION['id'] = $userdata['id'];
        $_SESSION['oauth_id'] = $uid;

        $_SESSION['username'] = $userdata['username'];
        $_SESSION['email'] = $userdata['email'];
        $_SESSION['oauth_provider'] = $userdata['oauth_provider'];
        header("Location: home.php");

    } else {
        // Something's missing, go back to square 1
        header('Location: error.php');
    }

}
?>

Index.php Page :-

Add this code in
<?php
session_start();
if (isset($_SESSION['id'])) {
// Redirect to home page as we are already logged in
header("location: home.php");
}
if (array_key_exists("login", $_GET))
{
$oauth_provider = $_GET['oauth_provider'];
if ($oauth_provider == 'google')
{
header("Location: login-google.php");
}
}
?>

//HTML Code

<a href="?login&oauth_provider=google">Google Login</a>
Welcome Page

Name: <?php $_SESSIONS['username'] >
Email: <?php $_SESSIONS['email'] >
Your are logged in with: <?php $_SESSIONS['oauth_provider'] >
<a href="logout.php?logout">Logout</a> from  <?php $_SESSIONS['oauth_provider'] >

Thursday, December 18, 2014

How to Integrate PayPal Payment Gateway in PHP

Want to integrate Paypal Payment Gateway in PHP in a very simple manner? First of all, In order to receive PayPal payments, you must have a PayPal account and registered with a valid email id. If you don't have PayPal account, you should register in it. This is the first step of it.

Integrate PayPal Payment Gateway in PHP
First Step :-
https://developer.paypal.com/  Create a PayPal Sandbox account.

Second Step :-

Further, you need to create test ccounts for payment system. Here, take a look at Sandbox menu left-side top Sandbox > Test Accounts

PayPal Integration

Third Step :-

Check out below, There are two accounts, one for Buyer and another for Seller.

PayPal Integration

index.php :-

<?php

$paypal_url='https://www.sandbox.paypal.com/cgi-bin/webscr'; // Test Paypal API URL
$paypal_id='your_seller_id'; // Business email ID

?>
<h4>Welcome, Guest</h4>

<div class="product">          
    <div class="image">
        <img src="http://freewebmentor.com/wp-content/uploads/2014/01/logo.png" />
    </div>
    <div class="name">
        Paypal Payment System
    </div>
    <div class="price">
        Price:$10
    </div>
    <div class="btn">
    <form action="<?php echo $paypal_url; ?>" method="post" name="frmPayPal1">
    <input type="hidden" name="business" value="<?php echo $paypal_id; ?>">
    <input type="hidden" name="cmd" value="_xclick">
    <input type="hidden" name="item_name" value="freewebmentor Payment">
    <input type="hidden" name="item_number" value="1">
    <input type="hidden" name="credits" value="510">
    <input type="hidden" name="userid" value="1">
    <input type="hidden" name="amount" value="10">
    <input type="hidden" name="cpp_header_image" value="http://freewebmentor.com/wp-content/uploads/2014/01/logo.png">
    <input type="hidden" name="no_shipping" value="1">
    <input type="hidden" name="currency_code" value="USD">
    <input type="hidden" name="handling" value="0">
    <input type="hidden" name="cancel_return" value="http://freewebmentor.com/paypal-payment/cancel.php">
    <input type="hidden" name="return" value="http://freewebmentor.com/paypal-payment/success.php">
    <input type="image" src="https://www.sandbox.paypal.com/en_US/i/btn/btn_buynowCC_LG.gif" border="0" name="submit" alt="PayPal - The safer, easier way to pay online!">
    <img alt="" border="0" src="https://www.sandbox.paypal.com/en_US/i/scr/pixel.gif" width="1" height="1">
    </form>
    </div>
</div>

Payment-success.php :-

You will be redirected to the payment-success.php page after completing the Payment process succesfully. You will get a success message here.

<?php

$item_no            = $_REQUEST['item_number'];
$item_transaction   = $_REQUEST['tx']; // Paypal transaction ID
$item_price         = $_REQUEST['amt']; // Paypal received amount
$item_currency      = $_REQUEST['cc']; // Paypal received currency type

$price = '10.00';
$currency='USD';

//Rechecking the product price and currency details
if($item_price==$price && $item_currency==$currency)
{
    echo "<h1>Welcome, Guest</h1>";
    echo "<h1>Payment Successful</h1>";
}
else
{
    echo "<h1>Payment Failed</h1>";
}

?>

cancel.php :-

<?php
echo "<h1>Welcome, Guest</h1>";
echo "<h1>Payment Canceled</h1>";
?>

How to Install Linux, Apache, MySQL, PHP on Ubuntu

LAMP server is a group of open-source software, and it is used for web servers start and running. LAMP is stands for Linux, Apache, MySQL and PHP. LAMP is very much suitable to build dynamic web pages as well as web applications. Let's check step by step how to install LAMP on Ubuntu.

How to Install LAMP on Ubuntu


Step One— Update

$ sudo apt-get update
$ sudo apt-get install tasksel

Step Two— Install lamp stack

$ sudo apt-get install lamp-server^

With using above command install the LAMP stack.

Now, you will be asked to insert MySQL root password, during the installation of LAMP server.


Now, Restart your apache using bellow command :

$ sudo service apache2 restart

Step Three— Insatll phpmyadmin

Install the phpmyadmin using bellow command

$ sudo apt-get install phpmyadmin

If you get a 404 error upon visiting http://localhost/phpmyadmin then you will need to configure apache2.conf to work with Phpmyadmin.

$ gksudo gedit /etc/apache2/apache2.conf

$ Include /etc/phpmyadmin/apache.conf

At last, Include the above line at the bottom of the file, save and quit.

Reference : http://freewebmentor.com/2014/12/install-linux-apache-mysql-php-lamp-server-ubuntu.html